Using guides and the grid
Guides appear as lines that float over the entire image and do not print. You can move, remove, or lock a guide to avoid accidentally moving it.
In Photoshop, a grid appears by default as nonprinting lines. The grid is useful for laying out elements symmetrically.
Guides and grids behave in similar ways:
Selections, selection borders, and tools snap to a guide or the grid when dragged within 8 screen (not image) pixels. Guides also snap to the grid when moved. You can turn this feature on and off.
Guide spacing, along with guide and grid visibility and snapping, is specific to an image.
Grid spacing, along with guide and grid color and style, is the same for all images.
To show or hide a grid or guides:
Do one of the following:
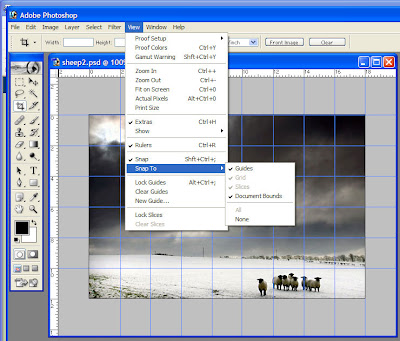
Choose View > Show > Grid.
Choose View > Show > Guides.
Choose View > Extras. This command also shows or hides: selection edges, target path, slices, and notes.
To place a guide:
If the rulers are not visible, choose View > Rulers.
Note: For the most accurate readings, view the image at 100% magnification or use the Info palette.
Create a guide:
Choose View > New Guide. In the dialog box, select Horizontal or Vertical orientation, enter a position, and click OK.
Drag from the horizontal ruler to create a horizontal guide.
Hold down Alt and drag from the vertical ruler to create a horizontal guide.
Drag from the vertical ruler to create a vertical guide.
Hold down Alt and drag from the horizontal ruler to create a vertical guide.
Hold down Shift and drag from the horizontal or vertical ruler to create a guide that snaps to the ruler ticks.
The pointer changes to a double-headed arrow when you drag a guide.
To move a guide:
Select the move tool , or hold down Ctrl (Windows) to activate the move tool. (This option does not work with the hand or slice tools.)
Position the pointer over the guide (the pointer turns into a double-headed arrow).
Move the guide:
Drag the guide to move it.
Change the guide from horizontal to vertical, or vice versa, by holding down Alt (Windows) as you click or drag the guide.
Align the guide with the ruler ticks by holding down Shift as you drag the guide. The guide will snap to the grid if the grid is visible and View > Snap To > Grid is selected.
To lock all guides:
Choose View > Lock Guides.
To remove guides from the image:
Do one of the following:
- To remove a single guide, drag the guide outside the image window.
- To remove all guides, choose View > Clear Guides.
To turn snapping to guides on or off:
Choose View > Snap To > Guides.
To turn snapping to the grid on or off:
Choose View > Snap To > Grid.
To set guide and grid preferences:
Do one of the following:
In Windows, choose Edit > Preferences > Guides, Grid, & Slices.
For Color, choose a color for the guides, the grid, or both. If you choose Custom, click the color box, choose a color, and click OK.
For Style, choose a display option for guides or the grid, or both.
For Gridline Every, enter a value for the grid spacing. For Subdivisions, enter a value to subdivide the grid.
If desired, change the units for this option. The Percent option creates a grid that divides the image into even sections. For example, choosing 25 for the Percent option creates an evenly divided 4-by-4 grid.
Click OK.

No comments:
Post a Comment