The professional graphic designer edits digital portraits before publishing them, in order to improve the appearance of the individual and put their "best face forward." Here are some common techniques used to improve portraits.
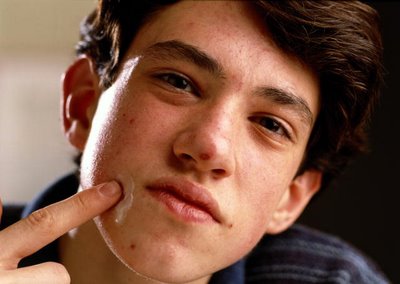
In class, we used this image of a teenage boy with acne.

The picture is quite dark and requires more midtones and brightness. So the first thing to do is to change the Image Levels.
Image Levels
In Photoshop with the image open, go to the Image pulldown menu, and select "Adjustments." First try "Auto Levels." This usually works for most photos, but if there are no changes to the image, or it makes the image look worse, then do the following...
Go to the Image pulldown menu, and select "Levels." You will see a graph depicting the dark, medium and light portions of the image. Usually if you pull the middle arrow icon to the left, it will brighten the mid-tones, making the image look better. Sometimes you will need to pull the left arrow icon to the right to make it darker, or the very right arrow icon to the left to make the white areas of the image brighter. Often it is a combination of these - experiment with them until you see an image that balances the dark tones, mid-tones and white-tones of the image. In this instance, I pulled the mid-tones to the left, making them brighter.
Healing Brush (Bandaid Icon) on Tool Bar
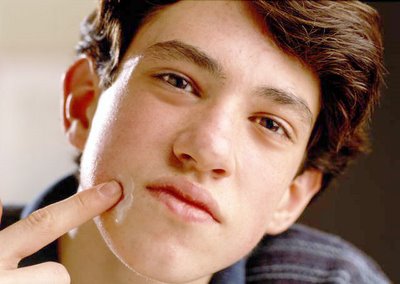
To fix the blemishes (pimples) on the model, the Healing Brush tool is used.
Once you've selected the Healing Brush tool, then make sure your brush is an appropriate size, using the context-specific bar across the top. Make the pixel radius of the brush smaller or larger, to get the right size.
Increase the zoom level of your screen (bottom left hand corner) to about 200-400%, so that you can see the detail of the blemish to be removed.
Select an area near the blemish, that is blemish free, and approximately the same colour and value as the area to be corrected. Then press the ALT key, and click in this area, in order to set the area from which the blemish will be corrected. This means that when you click on the blemish with your Healing Brush tool, the sampled area will replace the blemished area. Then through a series of algorithms, Photoshop averages out colour, value, etc. to make the area look as natural as possible, and blend in.
Each time you approach a new blemish to be corrected, select an area that is close to the blemish and is blemish free, ALT click, and then correct the blemish.
Do this until the model is blemish free.
Blur Tool on the Tool Bar
The Blur Tool (it looks like a water droplet) can be used to smooth out skin texture, remove or minimize wrinkles.
Once you've selected the Blur Tool, use the context-specific bar at the top to select an appropriate brush size (pixel radius), "Mode: Normal" and "Strength: 50-100%" to make the changes. The Strength affects how quickly the image area is blurred. If when you try to blur or blend the area and it's going too slowly, then increase the "Strength." This makes the action occur more quickly.
Do this under the eyes, or in any area where you think an area needs to be smoothened. Don't overdo it - it may end up looking unnatural. You may notice that his lips look cracked - blur the areas in his lips to smoothen them somewhat.
The other helpful thing the Blur Tool" can do is lighten areas, while blurring them. So under the eyes, you can lighten the dark circles. Using the context-specific bars across the top, select "Mode: Lighten" - and then move your cursor under the eyes to get a natural looking lightening under the eyes.
The Dodge Tool on the Tool Bar
The Dodge Tool is used to lighten areas, such as the whites of eyes or the teeth. Select the Dodge Tool, then using the context-specific bar on the top, select your brush size, the "Range" - if you're brightened eyes or teeth, the use "Midtones", and how strong the exposure should be. "50%" is usually quite good for this tool.
Then increase the zoom level of your image (using the bottom left hand corner percentage) to about 400%, and click your tool on the white of the eyes. Each time you click, the more it lightens. Try lightening the white reflection in the eye, as well as a bit on the iris. Don't overdo it - make it look natural.
If you make a mistake at any time, using your History Floating Palette, and step backward, until you've restore the image to where you want it.
Here's what we've accomplished so far:

Selection Tools
If you want to make areas of the photo a different colour, or delete them altogether, then it's important to know how to use the selection tools. Photoshop has at least 9 tools to do this. We looked at using the Lasso Tool, Polygonal Lasso Tool, the Magnet Lasso Tool and the Magic Wand Tool. Each has it's own attributes and reasons for using them.
Let's take a look at using the Magic Wand Tool. This tool is good for selecting areas that are similar in hue and value, such as the background of the image on the left hand side. The area is a fairly consistent beige/white, and is very different from the area to its right - the edge of the teenager's face.
Selecting the Magic Wand Tool, use the context-specific bar to decide on the "Tolerance" range. The lower the value, the more it will only select pixels of the same hue and value. The higher the value, the more it select pixels of different hue and value. By experimenting, you can find the right range.
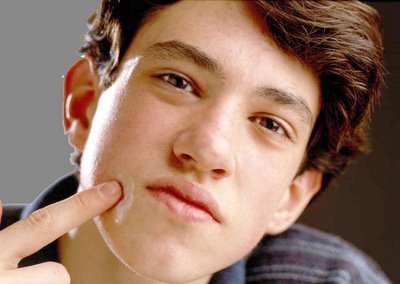
In our photo, I've used "Tolerance:32". When I click on the background (left hand side) it only selects the top 1/3 of this area. By holding down the shift key and clicking in the bottom 2/3 I am able to select the entire area.
In order to select more areas, hold down the shift key. You'll notice that your Magic Wand Tool cursor has a + (plus) sign next to it, indicating you're adding additional selected areas. To subtract areas, use the ALT key. It will show a - (minus) sign.
I noticed that the selected area included a part of the ear that shouldn't be selected (by the earlobe), so I zoomed into the image (300%), pressed the ALT key, then clicked with the Magic Wand Tool, and subtracted the area that it had selected. This makes the selection area more correct - it doesn't include part of his face, just the background.
Filling the Background with a Colour
In order to fill the area with a new colour, I use the Floating Swatches Palette. These are on the right hand of the screen. Make sure you select the "Swatches" tab to see the colour swatches. Select one.
You'll notice that on your tool bar, the "Foreground Colour" will change to the selected colour swatch.
Now go to the "Edit" pulldown menu, select "Fill". A dialogue box will ask you "Contents: Fill:" and select "Foreground Colour." There are other options, such as "Background Colour", Black, White and 50% Grey.
Press OK, and the area you have selected with fill with your Foreground Colour.
To DESELECT the area, either press "Ctrl D" (D is for Deselect" or go to the "Select" pulldown menu, and choose "Deselect."
These are the basics that we've covered so far. More next class.

No comments:
Post a Comment